Fair Value Gap (FVG) Indicator
Learn how to use the Fair Value Gap indicator in Gainium for automated trading, leveraging Smart Money Concepts to identify institutional price imbalances and build effective bot trading strategies.
TL;DR
The Fair Value Gap (FVG) indicator identifies three-candle price inefficiencies where institutional orders created gaps, which act as magnets drawing price back. Bullish FVGs serve as support and bearish FVGs as resistance; combine with Market Structure analysis for high-probability entries.
The Fair Value Gap (FVG) indicator is a powerful tool rooted in Smart Money Concepts (SMC) that identifies areas of price inefficiency where institutional orders have left gaps in the market. These gaps represent imbalances between buying and selling pressure and often act as "magnets" for price, drawing it back to fill these inefficiencies. Understanding and trading Fair Value Gaps can provide high-probability entry and exit points when combined with market structure analysis.
In this article, we'll define the Fair Value Gap indicator, explain how to configure it in Gainium, and provide detailed trading strategies with entry and exit rules. We'll also explore how FVGs relate to Market Structure and discuss practical considerations for incorporating them into your automated trading strategies.
What is a Fair Value Gap (FVG)?#
A Fair Value Gap occurs when there is a three-candle pattern where the middle candle creates a gap that isn't filled by the wicks of the candles on either side. This gap represents an area where price moved so quickly that very little trading occurred, creating an imbalance.
Types of Fair Value Gaps:#
- Bullish FVG: Forms during upward price movement when the high of the first candle doesn't touch the low of the third candle. This gap often acts as support when price returns to it.
- Bearish FVG: Forms during downward price movement when the low of the first candle doesn't touch the high of the third candle. This gap typically acts as resistance when price revisits it.
Key Characteristics:#
- Price Magnets: FVGs act as magnets, attracting price back to fill the inefficiency before continuing in the original direction or reversing.
- Support/Resistance Zones: Bullish FVGs become support zones, while bearish FVGs become resistance zones.
- Institutional Footprints: FVGs often mark areas where smart money (institutional traders) entered the market aggressively, leaving behind these imbalances.
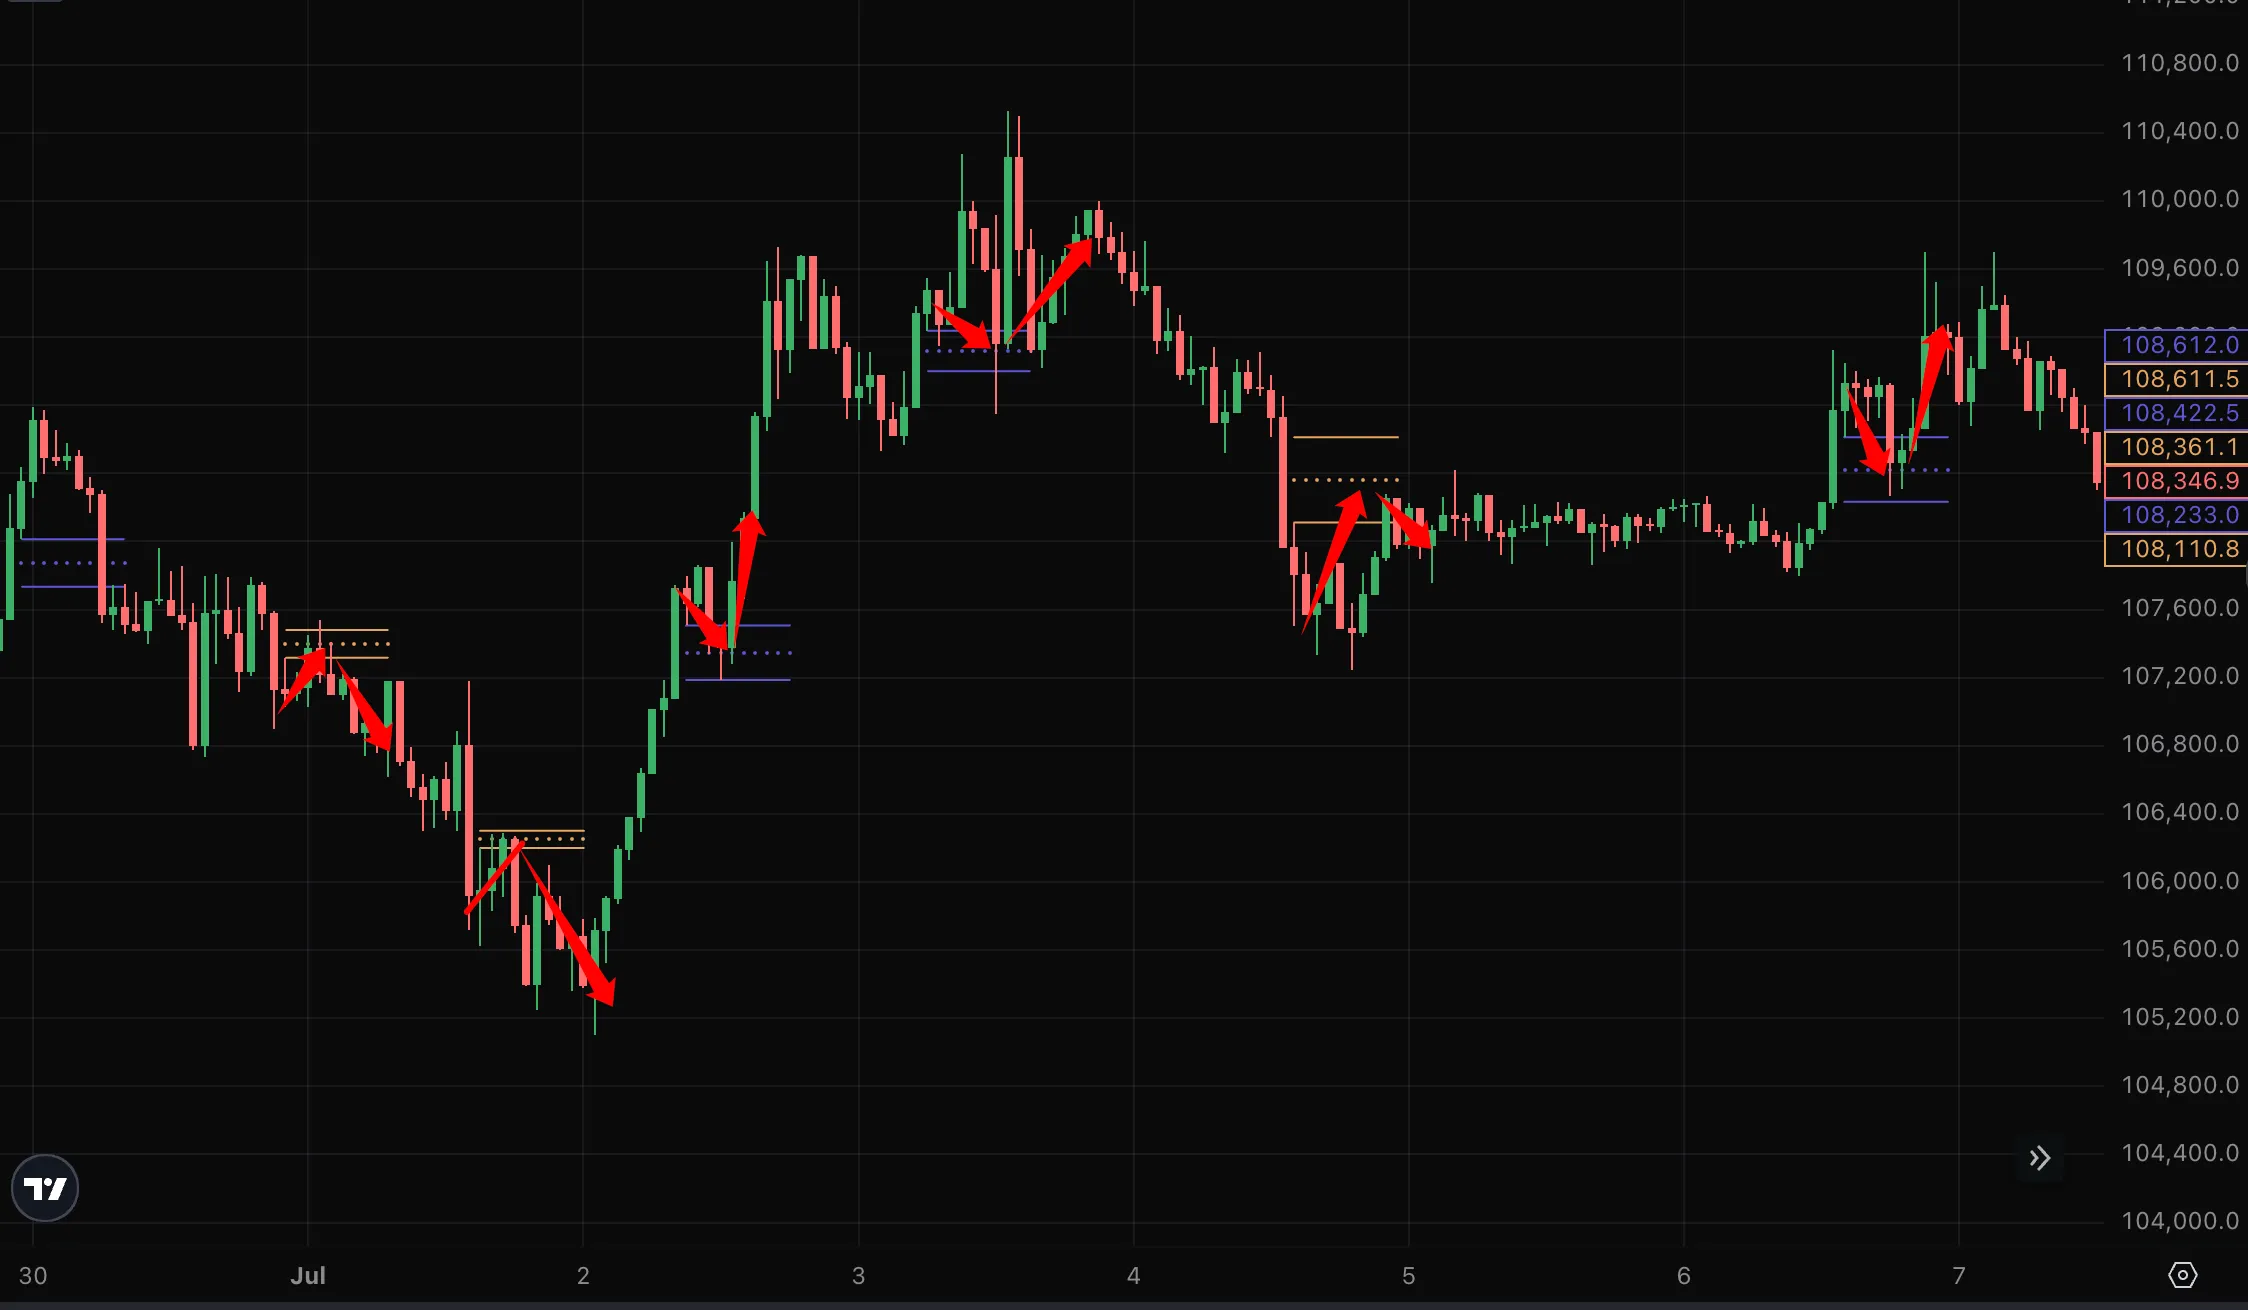 Example of Bullish and Bearish Fair Value Gaps
How FVGs Relate to Market Structure#
Fair Value Gaps work exceptionally well when combined with Market Structure analysis. Market structure identifies the overall trend direction through breaks of structure (BOS) and changes of character (CHoCH), while FVGs provide precise entry zones within that structure.
Integration with Market Structure:#
- Trend Continuation: After a break of structure (BOS) in a trending market, FVGs in the direction of the trend offer high-probability entry points.
- Reversal Zones: When a change of character (CHoCH) occurs, FVGs from the previous trend can act as reversal zones.
- Confluence: The strongest setups occur when FVGs align with key market structure levels like swing highs/lows or pivot points.
For more information on identifying market structure, see our Market Structure Indicator guide.
How to Configure the Fair Value Gap Indicator in Gainium#
Here's how to set up the Fair Value Gap indicator in Gainium to detect these powerful price zones.
Step 1: Add the Fair Value Gap Indicator#
- Navigate to Bot Settings: Log into Gainium, select your bot, and add the Fair Value Gap indicator from the available indicators list.
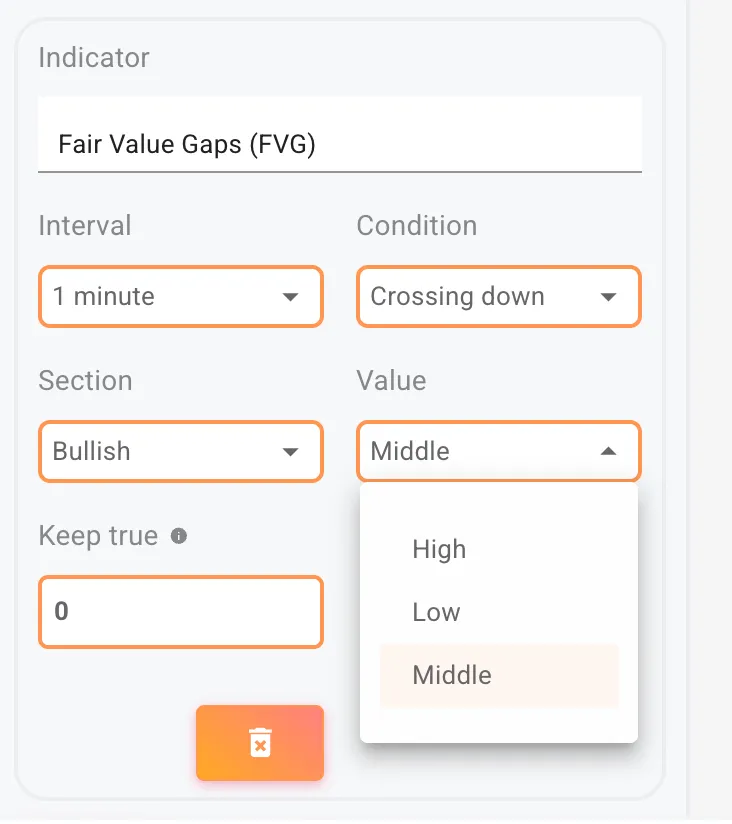
Step 2: Configure the Indicator Settings#
FVG Type
Choose the type of Fair Value Gap you want to detect:
- Bullish: Detects only bullish (upward) Fair Value Gaps that may act as support.
- Bearish: Detects only bearish (downward) Fair Value Gaps that may act as resistance.
- Any: Detects both bullish and bearish FVGs, useful for strategies that trade in both directions.
 Fair Value Gap Indicator Settings
Condition
Select how price should interact with the FVG:
- Crossing Up: Triggers when price crosses upward through the specified FVG line (useful for confirming bullish reactions).
- Crossing Down: Triggers when price crosses downward through the specified FVG line (useful for confirming bearish reactions).
- Greater Than: Triggers when price is above the specified FVG line (useful for confirmation that price has filled the gap).
- Lower Than: Triggers when price is below the specified FVG line (useful for bearish confirmation).
FVG Line Reference
Choose which part of the FVG to use as the reference:
- High: The upper boundary of the Fair Value Gap (bottom of the candle that created the gap's upper bound).
- Low: The lower boundary of the Fair Value Gap (top of the candle that created the gap's lower bound).
- Middle Line: The midpoint of the Fair Value Gap, often the most significant level for price reactions.
Additional Settings
- Interval: Set the timeframe for FVG detection (e.g., 1 hour, 4 hours, 1 day). Higher timeframes generally produce more significant FVGs.
- Keep True: Specify how long the condition remains true after it triggers (0 means it resets immediately).
Using Fair Value Gaps in Bot Trading#
Fair Value Gaps offer multiple trading opportunities when used correctly. Here are three comprehensive strategies for incorporating FVGs into your automated trading.
Strategy 1: FVG Fill and Rejection Strategy (Mean Reversion)#
This strategy capitalizes on price returning to fill an FVG and then reacting from it, continuing in the original direction.
Entry Rules
-
Long Entry (Buy):
- Identify a Bullish FVG that formed during an upward move.
- Wait for price to retrace and enter the FVG zone (price crossing down into the FVG).
- Enter when price shows rejection from the FVG middle line, crossing back up.
- Confirm with bullish market structure (no change of character).
-
Short Entry (Sell):
- Identify a Bearish FVG that formed during a downward move.
- Wait for price to retrace and enter the FVG zone (price crossing up into the FVG).
- Enter when price shows rejection from the FVG middle line, crossing back down.
- Confirm with bearish market structure (no change of character).
Exit Rules
-
Long Exit:
- Exit when price reaches the next higher timeframe resistance or Fair Value Gap.
- Or when price breaks below the FVG low, indicating the gap failed to hold as support.
-
Short Exit:
- Exit when price reaches the next higher timeframe support or Fair Value Gap.
- Or when price breaks above the FVG high, indicating the gap failed to hold as resistance.
Implementation in Gainium
- Set FVG Type: Configure to detect "Bullish" FVGs for long setups or "Bearish" FVGs for short setups.
- Condition 1: Set to "Crossing Down" the "Middle Line" for initial entry into the gap (for longs).
- Condition 2: Add a second trigger for "Crossing Up" the "Middle Line" for the rejection confirmation.
- Combine with Market Structure: Use the Market Structure Indicator to confirm the trend hasn't changed.
Strategy 2: FVG Breakout Strategy#
This strategy trades the continuation after an FVG has been filled, anticipating strong momentum in the original direction.
Entry Rules
-
Long Entry (Buy):
- Identify a Bullish FVG in an uptrend.
- Wait for price to fill the FVG (price crosses down to the low of the FVG).
- Enter when price breaks back above the FVG high, confirming the gap has been filled and buying pressure resumes.
-
Short Entry (Sell):
- Identify a Bearish FVG in a downtrend.
- Wait for price to fill the FVG (price crosses up to the high of the FVG).
- Enter when price breaks back below the FVG low, confirming the gap has been filled and selling pressure resumes.
Exit Rules
-
Long Exit:
- Exit at the next significant resistance level or when a bearish FVG forms.
- Use a trailing stop to capture extended moves.
-
Short Exit:
- Exit at the next significant support level or when a bullish FVG forms.
- Use a trailing stop to capture extended moves.
Implementation in Gainium
- Set FVG Type: Use "Any" to detect both types of FVGs.
- Entry Condition: "Greater Than" the "High" for bullish breakouts, "Lower Than" the "Low" for bearish breakouts.
- Stop Loss: Place stops just inside the FVG to minimize risk if the breakout fails.
Strategy 3: Multi-Timeframe FVG Confluence Strategy#
This advanced strategy uses FVGs from multiple timeframes to identify high-probability zones where institutional orders are likely concentrated.
Entry Rules
-
Long Entry (Buy):
- Identify a Bullish FVG on a higher timeframe (e.g., daily or 4-hour).
- Wait for price to enter this FVG zone.
- Look for a Bullish FVG on a lower timeframe (e.g., 1-hour or 15-minute) within the higher timeframe FVG.
- Enter when price reacts from the lower timeframe FVG, crossing up through its middle line.
- Confirm with bullish market structure on both timeframes.
-
Short Entry (Sell):
- Identify a Bearish FVG on a higher timeframe.
- Wait for price to enter this FVG zone.
- Look for a Bearish FVG on a lower timeframe within the higher timeframe FVG.
- Enter when price reacts from the lower timeframe FVG, crossing down through its middle line.
- Confirm with bearish market structure on both timeframes.
Exit Rules
-
Long Exit:
- Primary target: Opposite side of the higher timeframe FVG.
- Secondary target: Next higher timeframe resistance or bearish FVG.
-
Short Exit:
- Primary target: Opposite side of the higher timeframe FVG.
- Secondary target: Next higher timeframe support or bullish FVG.
Implementation in Gainium
- Multiple Indicator Instances: Add two FVG indicators with different intervals (one for higher timeframe, one for lower).
- Complex Conditions: Use Gainium's condition builder to require both FVG triggers to align.
- Risk-Reward: This setup typically offers excellent risk-reward ratios (3:1 or better).
Practical Considerations#
When implementing Fair Value Gap strategies in your automated trading, consider these important factors:
1. Not All FVGs Are Equal#
- Context Matters: FVGs that form at key market structure levels (swing highs/lows, break of structure points) are more significant than those in ranging markets.
- Timeframe Hierarchy: Higher timeframe FVGs (daily, 4-hour) are more reliable than lower timeframe gaps (5-minute, 15-minute).
- Volume Profile: FVGs that form on high volume moves are more likely to act as strong support/resistance.
2. FVG Lifecycle#
- Fresh FVGs: Newly formed gaps often provide the best reactions on first touch.
- Partially Filled: FVGs that have been partially filled but respected still hold significance.
- Fully Filled: Once an FVG is completely filled, it loses its magnetic effect, though it may still act as a support/resistance zone.
3. Market Conditions#
- Trending Markets: FVGs work best in trending markets where they align with the overall market structure.
- Ranging Markets: In choppy conditions, FVGs may give false signals as price oscillates without clear direction.
- High Impact News: Be cautious around major news events that can cause price to blast through FVGs without respect.
4. Risk Management#
- Stop Placement: Place stops beyond the opposite end of the FVG with some buffer for volatility.
- Position Sizing: Reduce position size in volatile markets where FVGs may be less reliable.
- Partial Profits: Consider taking partial profits at the FVG midpoint in mean reversion trades.
5. Combining with Other SMC Tools#
- Order Blocks: FVGs often form near order blocks; the confluence strengthens the setup.
- Liquidity Zones: Price may sweep liquidity before returning to fill an FVG.
- Market Structure: Always confirm FVG setups with the broader market structure context using the Market Structure Indicator.
6. Backtesting and Optimization#
- Historical Performance: Backtest your FVG strategy across different market conditions and timeframes.
- Parameter Tuning: Experiment with different FVG line references (high, low, middle) to find what works best for your chosen assets.
- False Signal Filtering: Add confluence requirements (e.g., RSI, volume) to reduce false signals.
Advanced Tips#
FVG Clustering#
When multiple FVGs cluster in the same price zone across different timeframes, it creates a "premium" or "discount" zone that institutional traders are likely targeting. These zones offer exceptional trading opportunities.
FVG Mitigation vs. Fill#
- Mitigation: Price touches the FVG zone but doesn't fully fill it, often resulting in strong reactions.
- Full Fill: Price completely fills the gap, which can lead to either reversal or continuation depending on market structure.
Session-Based FVGs#
FVGs that form during specific trading sessions (London open, New York open) often carry more weight as they reflect institutional order flow from major financial centers.
Conclusion#
The Fair Value Gap indicator is an essential tool for traders looking to leverage Smart Money Concepts in their automated trading strategies. By identifying areas of price inefficiency where institutional traders have left their footprint, FVGs provide high-probability entry zones when used in conjunction with proper market structure analysis.
Whether you're trading FVG rejections for mean reversion, breakouts for trend continuation, or multi-timeframe confluence setups, understanding how these gaps act as price magnets will significantly enhance your trading edge. Remember to always confirm FVG setups with the broader Market Structure context and maintain proper risk management.
Experiment with different FVG configurations in Gainium, backtest thoroughly across various market conditions, and integrate these powerful Smart Money Concepts into your automated trading arsenal for more informed and profitable trading decisions.