DCA bot set up walkthrough
This article shows you how to set up a DCA bot by walking through a practical example.
TL;DR
A step-by-step guide to setting up a long DCA bot on Gainium using BTC/USDT, covering basic settings, deal start conditions (with RSI as an example), take profit, stop loss, DCA mode configuration, backtesting, and bot controller options.
In this article, I will guide you through the setup of a long DCA bot on Gainium. A long bot is a bot that buys low and sells at a higher price. If you are new to DCA, you may want to check our DCA bot basics article. This article applies whether you are creating a new bot or editing an existing one. However, keep in mind that if you edit the configuration of an existing bot, the new settings will only be applied to future deals (existing deals are unaffected).
For this tutorial, I am using the pair BTC/USDT. This bot setup is quite conservative, and it can be improved; I just want to jump-start you with some generic tips to avoid getting a bot stuck with a red bag. It can be used as a guideline to create your bots.
First, head to the new trading bot page. On the right-hand side, you can find the bot configuration; let's explore all configuration options.
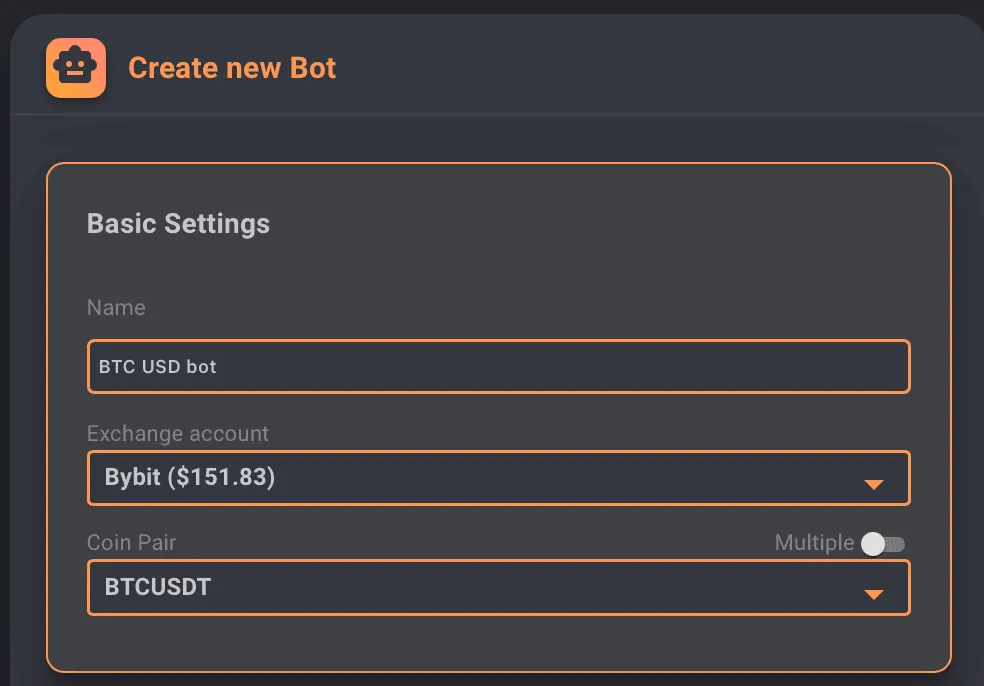
BASIC SETTINGS#
 Picture 1
Name#
You can give any name to your bot. The name is displayed in the bot table, the deals table, and error messages.
Tip: you should create a name that would make it easy to differentiate from other bots. For example, you could reference the kind of strategy such as “RSI+MFI Aggressive 2.0”. This can also be handy to filter bots sharing certain configuration options so you can bulk stop/start bots. Don't fret too much over it, though; you can always edit the name at any point.
Exchange account#
Choose which exchange the bot should run on. Note that the Exchange account cannot be edited later.
Coin pair#
Choose any coin pair supported by the exchange.
You can choose one or multiple pairs as long as they have the same quote currency. The first pair sets the quote currency. For example, if you add BTC/USDT, you can only add other /USDT pairs to the bot.
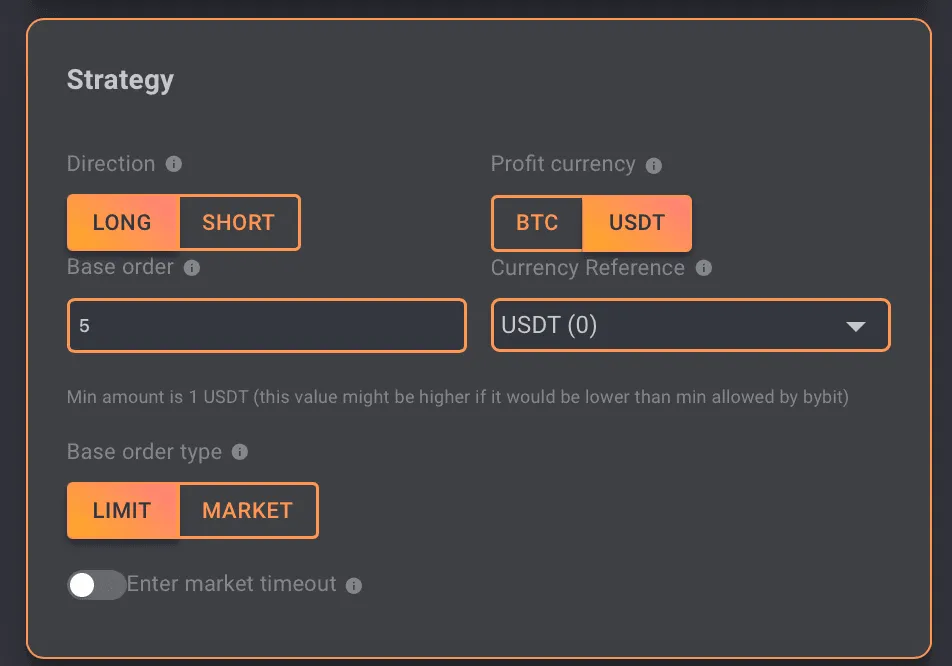
STRATEGY#
 Picture 2
Direction#
In this setting you can specify if you want to go long (buy lower, sell higher) or short (sell higher, buy lower). I have selected a long strategy (it is already the default).
Profit currency#
You can specify if you want to profit in base or quote. Choose quote currency if you expect the pair to move sideways or upwards and you want to make profit in quote currency. Choose the base currency if you expect the paid to move sideways or downwards and you want to make profit in base currency.
In the example above (Picture 2), I have chosen USDT, but note that you can take profit in the other pair, so this bot could be used to accumulate “free” BTC instead of USDT. If you want to know more about this, check out this article.
Base order and currency#
This is the first order the bot will make. If DCA mode is disabled, this will be the only order the bot will make.
How the base order behaves depends on the currency selected. The options are:
For Longs
- Quote- Base- % quote free- % quote total
Note that a long strategy will always use quote to purchase base, even if you use base as the currency reference. For example, in a long ETH/USDT bot, suppose you choose 1000 USDT as the base order. This way, the bot will always purchase 1000 USDT's worth of ETH, no matter what the value of ETH is. However, if you set the currency reference to 1 ETH, the bot will use as much USDT as necessary to buy 1 ETH. So if 1 ETH = 1000 USDT at one point, it will spend 1000 USDT. But if the value of ETH increases to 1500 USDT, it will spend 1500 USDT as the base order.
For Shorts
- Quote- Base- % base free- % base total
Note that a short strategy will always sell base to obtain quote, even if you use quote as the currency reference. For example, in a short ETH/USDT bot, suppose you choose 1 ETH as the base order. This way, the bot will always sell 1 ETH, no matter what the value of ETH is. However, if you set the currency reference to 1000 USDT, the bot will sell as much ETH as necessary to obtain 1000 USDT. So if 1 ETH = 1000 USDT at one point, it sells exactly 1 ETH. But if the value of ETH increases to 1500 USDT, it will sell 0.6666 ETH as the base order.
A note on working with %
When you set your bot to use % of the token, you input the % value as a number from 0 to 100. For example, writing 30 in the base order quantity and % USDT total will result in the bot using 30% of my total USDT to open the first trade.
The base order and all DCA orders sum should not exceed 100. Also, they should sum less than 100, as summing exactly 100 may cause insufficient balance errors due to rounding or exchange minimum order limits.
In the example, I am using 5 USDT as a Base Order as I am using Bybit. Each exchange has a different minimum order size (Binance, for example, has a minimum of 10 USDT).
Base order type#
Here you can choose how the bot will execute the base order, as a limit or market order.
A limit order is sent to the exchange's order book, and it waits to be executed at a certain price. A limit order guarantees the best price and may incur lower fees but may not be filled immediately. Gainium will re-submit limit orders every 20 seconds at the best price until the order is fulfilled.
A market order is executed immediately at the market price, skipping the exchange order book. A market order guarantees to be filled immediately, but it may not be the best price and may incur higher fees. It can be particularly risky for pairs with low liquidity where the price is very volatile. The advantage of market orders is that the order executes much faster than a limit order.
Enter market timeout#
This option is available for limit order types. You can choose this option if you prefer to use a limit order but would like to ensure a maximum waiting time. When this option is activated, you can set up a timer, and a limit order will be sent to exchange and repositioned every 20 seconds as per the default behavior. If the order has not been fulfilled within the time specified, the limit order will be canceled, and a market order will be placed instead.
Tip: I tend to use limit most of the time. It's cheaper and safer for most of the basic bots setups. Exchanges usually have lowers fees for limit orders as they try to reward traders for providing liquidity to the exchange. You can see the difference by checking your exchange fees for makers and takers. Makers = Limit orders fees that provide liquidity, Takers = Market orders fees that takes liquidity from the exchange.
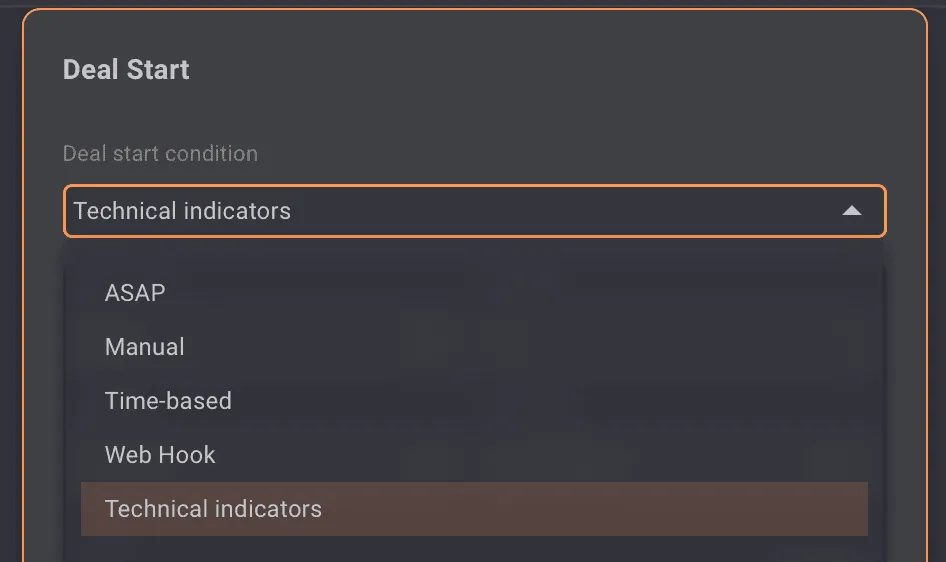
DEAL START#
 Picture 3
This section allows you to select how you want your bot to start new deals, is one of the most critical parts of the bot, and it deserves an article of its own, but for now, let's go through an overview of each option.
- ASAP: this option is the simplest strategy and will ensure that the bot never stops trading. It will start a deal as soon as the bot starts and open a new deal as soon as the previous one is closed. This may be used by traders that expect the market to go in a specific direction.
- Manual: in manual mode, the bot will never open a deal by itself. Traders can open new deals by clicking the “New deal” button.
- Time-based: this option will allow you to open a new deal at regular time intervals. With the time-based deal start, you can set up bots that accumulate coins, aka HODL bots.
- Webhook: the bot will listen for incoming webhooks to start or stop deals. Webhooks can be sent from platforms such as TradingView. You can learn more about it here.
- Technical indicators: with this option, you can create any combination of technical indicators to start a new deal.
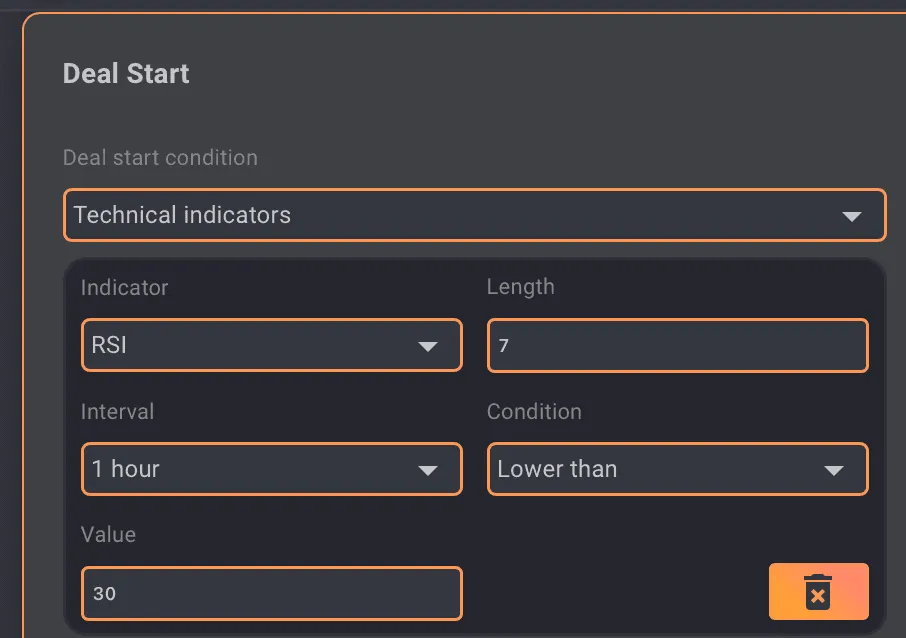
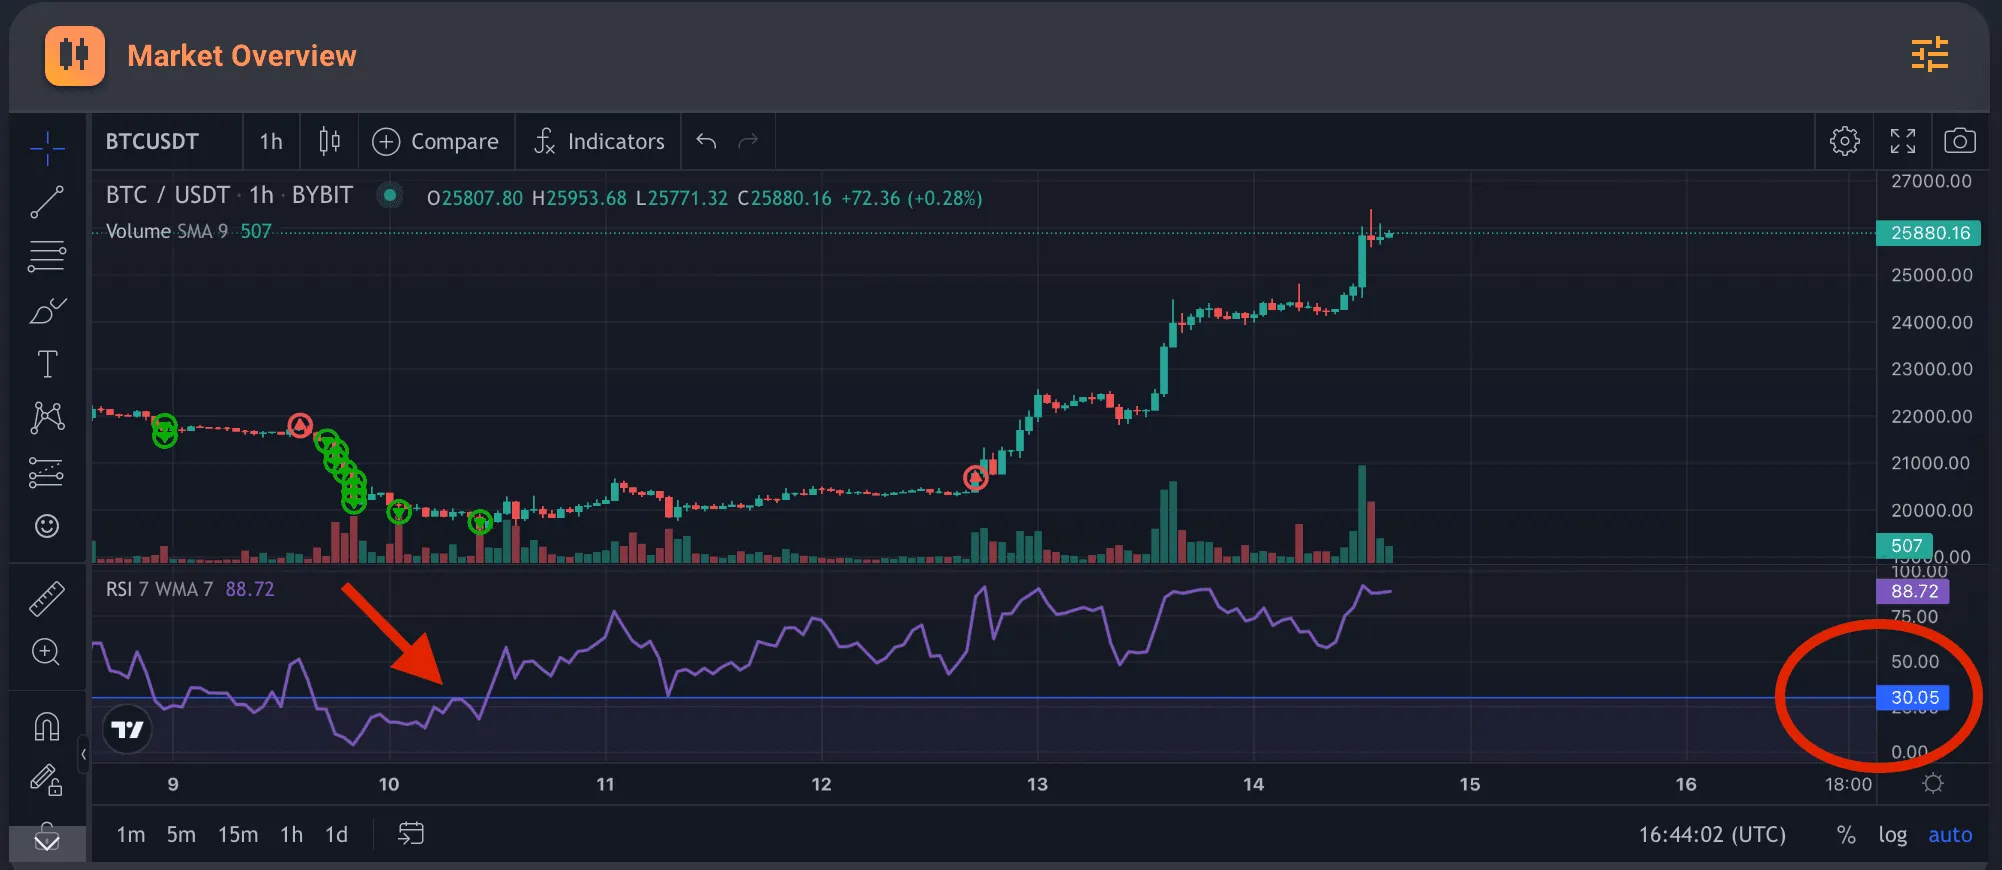
Even though ASAP is the most simple strategy, this deal start condition can be very risky when the market is not on a strong uptrend. The best option would be to use a strategy that filters out possible bad entries, buying only when the price has already retraced and has a higher chance to rise again. We have several options to do it. For the bot example (picture 4), I will select Technical Indicators. And then, I select the RSI Indicator. I am a big fan of this indicator, as you can come up with very strong and profitable bots setups just by using only this to filter out deals.
RSI, or Relative Strength Index, is a momentum indicator that measures the speed and magnitude of an asset’s price change.
I am using standard settings for this example (as shown in picture 4).
 Picture 4
Generally, in Technical Analysis, an asset is considered oversold when the RSI is below the value of 30 and overbought when is over 70. I want my bot to start a deal only when the RSI is below 30 in the 1-hour time frame. The higher the timeframe used, the more conservative the bot will be, so it’s crucial to find the right balance between how often you want to enter the market and how much risk you want to take. The same RSI indicator could be risky if used on a 5 min TF as the value can go below 30 very quickly and often. On the contrary, on a daily timeframe, the rsi will stay relatively high and rarely below 30. So your bot will open very few deals.
The picture below (Picture 5) shows how the RSI decides when the bot starts. I drew a line on the level of 30 so you can see that the bot opens a deal only when the indicator is below that value. In Gainium, you can see the chart of the pair you are trading, and you can bring in the chart in the indicator you want to use to start your deals. It is very useful to visualize it as sometimes you can improve a bot's performance by changing the indicators parameters slightly, and you won’t see it unless you have the chart in front of you. For example, you might make your bot much safer by using RSI 28 because the token is highly volatile or more profitable by changing it to 32. After all, maybe this asset rarely hits 30, and so on.
 Picture 5
 Picture 6
Max open deals#
With this option (Picture 6), you can limit the number of open deals the bot can have at any time. Once the number of deals has reached the max open deals, the bot will ignore further signals to start a new deal.
When a multipair bot receives more deal start signals than the allowed max open deals, it randomly assign the available deal quota. For example, suppose we start a multipair bot with 100 pairs and five max open deals, and the deal start condition is RSI 15 min > 70. On the next candle, 10 out of the 100 pairs meet this condition, but as the bot is only allowed to trade five at once, it will open five deals randomly from the set of 10 possible pairs.
TAKE PROFIT#
 Picture 7
This section is pretty self-explanatory however it's very important to find the right amount!
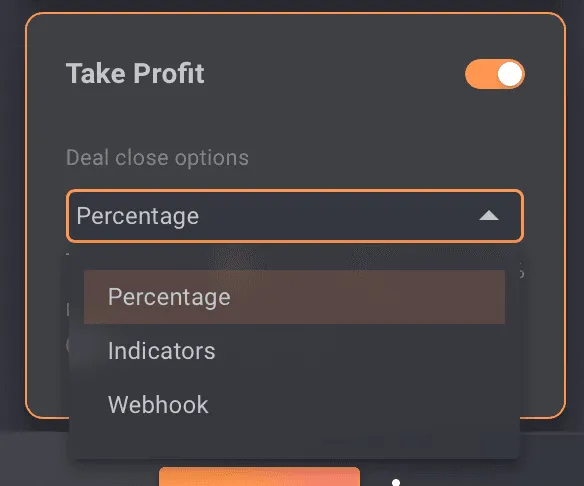
Take profit %#
This is the profit percentage that the bot will make on each trade. Note that exchange fees are considered, so you don't have to worry about that. Gainium now also offers Multiple Take Profit and Take Profit conditions. Please see this article for more details.In the bot example (picture 8), I am using only 0.5%. There is also the option to use another indicator to Take Profit and close the deal or set up an alert from external platforms like Tradingview (webhook). I am using only 0.5% because BTC is the slowest moving crypto asset and I want to make sure I don't stay in a deal open for too long, and the price slips down again before I manage to take profit. The number one rule I try to remind myself of many times is that profit is profit, no matter how small, and I need to take it. With other pairs and different settings, the sky can be the limit for your TP.
Trailing Take Profit#
It is used by traders to increase their gains when the price move in a favorable direction.The trailing is activated when the price reaches your Take Profit target. This is great when the price continues moving past your original Take Profit target as the Trailing feature will follow the price by a percentage that you configure (acting like a buffer); when the price reverses by the Trailing deviation percentage you configure, the trade is closed. Usually, the larger your take profit is, the larger your trailing should be. It takes practice to find the right amount, and it depends on the token you are trading. There are pros (the larger gains) and cons to using this feature, as you can also lose a part of the profit if the price reverses immediately after the trailing feature has been activated. In tokens that are very volatile and have low liquidity, the Trailing Take Profit might also close a deal at a loss as the price will move too fast for the trailing to trigger.
 Picture 8
Stop Loss#
 Picture 9
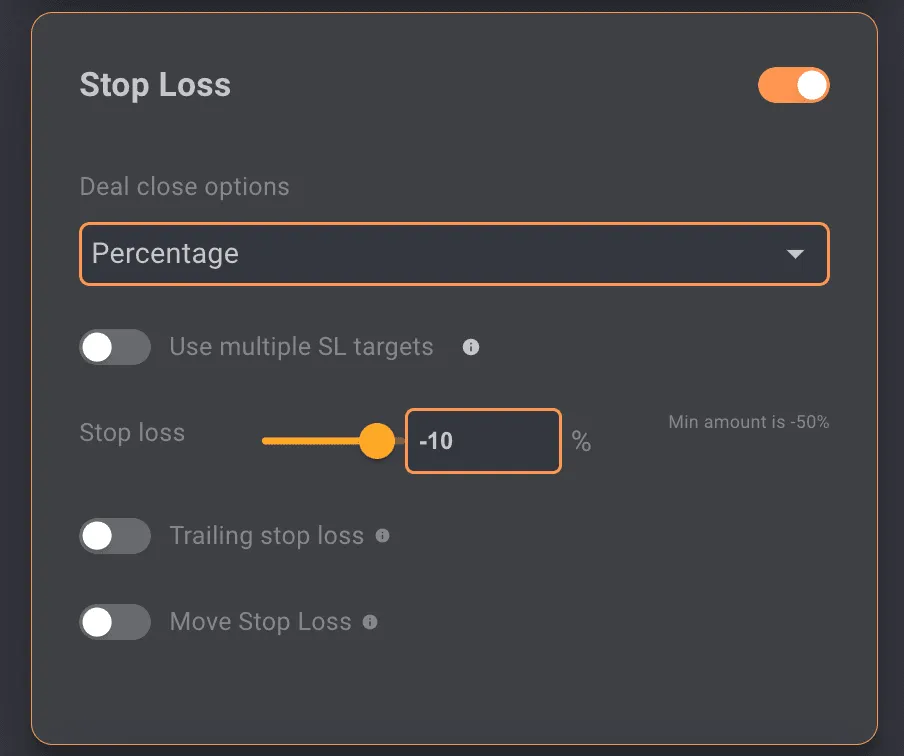
Stop loss %#
This is the unrealized P&L percentage that will trigger the deal close condition. If DCA mode is activated, the stop loss % is calculated on the average purchased price.
Move stop loss#
With this option, you can move the stop loss to a new value when a certain unrealized P&L is reached. This is useful, for example, to lock in a profit by moving the SL to a positive number when a certain unrealized profit has been reached.
If the new stop loss moves over DCA orders, all the orders under it will be canceled.
Trailing stop loss#
Activating trailing stop loss will move the stop loss in the direction of your take profit, always spaced the same distance from the best price.
Some considerations:
- When the trailing stop loss moves over a DCA order, the DCA order will be canceled- Safety orders cannot be placed under the active stop loss value- Trailing stop loss and trailing take profit cannot be active simultaneously. If both activates, trailing stop loss will deactivate and only trailing take profit will be active
I am not using any Stop Loss for this example as I don't consider this bot setup risky and because backtesting demonstrated that all deals closed in profit without waiting too long. In many DCA bots set up on spot, a Stop Loss is considered a stop profit, as the main idea is to buy while the price is decreasing, not sell when it's low. There are, however, many DCA bots setups on spot market that can still benefit from using a SL.
DCA MODE#
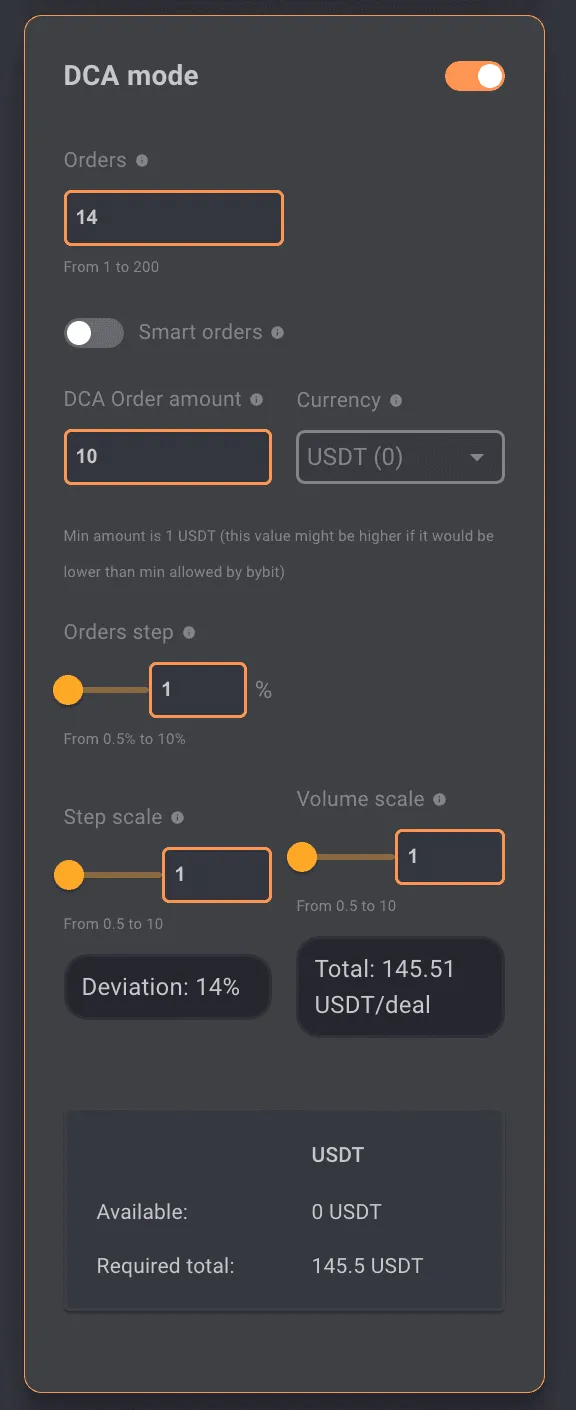
This is the section where the DCA comes into play (picture 10).
 Picture 10
Number of DCA orders#
This is the number of orders generated each time you run a DCA cycle.In this example, I want to have 14 orders below my initial Base Order of 5 usdt, I want each DCA order to be 10 USDT (DCA order amount) and to fill my next order when the price drops 1% below my initial Base Order (Orders Step = 1%, which is also the interface’s default setting).
Smart Orders#
Activating this will allow you to only send a portion of all DCA orders to the exchange as a limit order. You can learn more about smart orders in this article. Smart Orders is not activated by default, and the bot will send all the DCA orders to the exchange.Tip: having all Smart Orders off allows you to catch falling knives or fat fingers if they happen. They are easy to spot in the charts as the candles have no body but leave a huge wick (Picture 11).
 Picture 11
Sometimes there are errors in the exchanges or mistakes made by traders (fat fingers), so the price suddenly drops (also, the opposite is possible, so the price pumps unexpectedly). If your order is already placed in the exchange, It will fill immediately as it front-runs the others, and the deal closes faster and with more profits.
I like to have Smart Orders off as a safety measure. I want the bot to lock up all funds necessary to run the deal as soon as it starts. If, for whatever reason, I don’t have enough funds, the deal won't start. This is very important as many times at the beginning of my trading bot days I ended up not having enough funds to close a deal. A bot that, during backtest, closed all deals with 14 orders might not close if you suddenly have only funds for 13.
DCA order amount and currency#
This is the starting DCA order amount. Note that the currency on the base order and DCA orders must match.
DCA Oder Step#
This is the percentage offset from the current market price you want your bot to use when placing your orders.
Step scale#
The DCA order step will be multiplied by the scale each time. For example, if the step scale is 2, the distance between DCA orders doubles each time.
Volume scale#
The DCA order volume will be multiplied by the scale each time. For example, if the volume scale is 2, the DCA order volume doubles each time.
In my example, I have left the step and volume scale equal to 1 as per default settings ( Picture 10). Lastly, I check that I have enough funds to run this bot. In the information box at the end of the bot setup, I can see that the required total is 145.5 USDT, and I have 0 USDT total, so I would need to add some USDT.
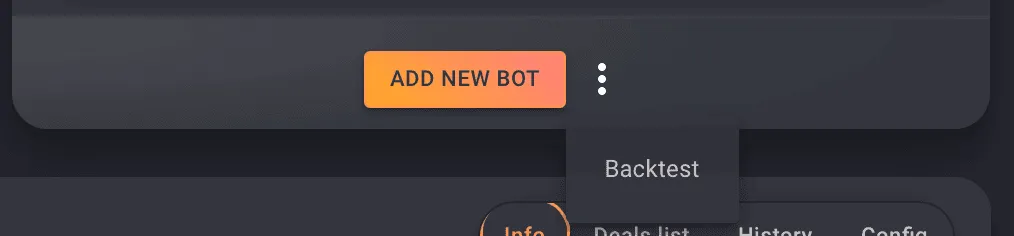
BACKTEST#
Before starting any bot I always want to ensure I run several backtests and Gainium has a Backtester built in so you can test your strategy with historical data. Backtesting is a very long topic so for this guide I just want to show you how to start it. You can run the backtest at the end of the bot settings by clicking on the three dots (Picture 11).
 Picture 12
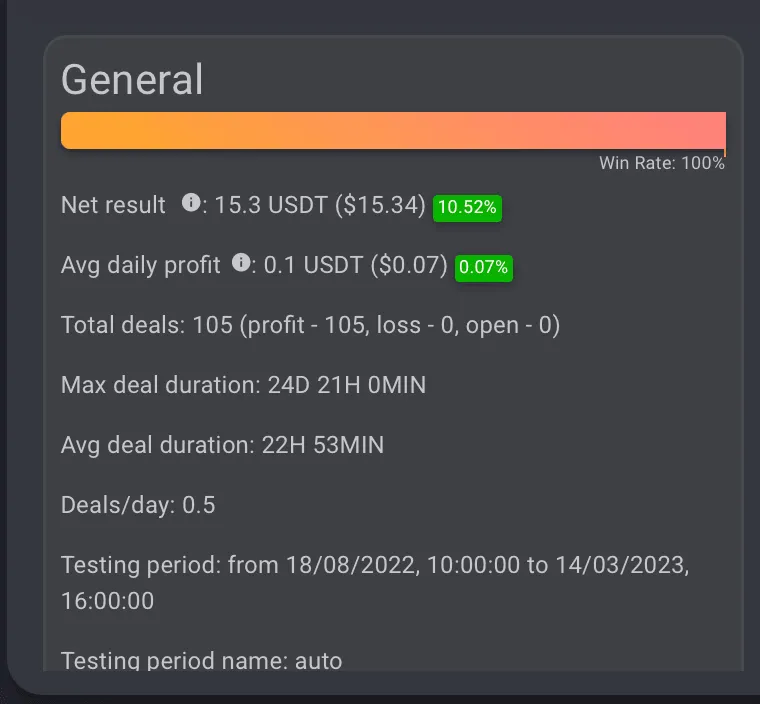
As you can see from the results (Picture 13), for a quick and simple setup, the results are not too bad but can certainly be improved. This strategy returned an average daily profit of 0.07% and a total profit of 10.52% over a period of 7 months.
 Picture 13
The idea behind this article is that you can use this setup as a starting point for creating your strategies just by changing the values in the previous steps. In general, tiny changes go a long way as once you find a profitable strategy, you need to make small adjustments to perfect it.
For example, you can try the same setup on another pair and see different results. If I were using another pair, one of the first things I would change would be increasing the Take Profit.
Another example could be to increase the volume scale and step scale as discussed in the article about how DCA works, as this will probably reduce the Max deal duration of 24 days. I prefer bots strategies that close in less than five days. Most deals are completed in less than 24 hours, so that is good.
Each indicator selected as a deal start condition will greatly impact a bot's performance, and it’s important to learn about each indicator to understand how the bot will trade.
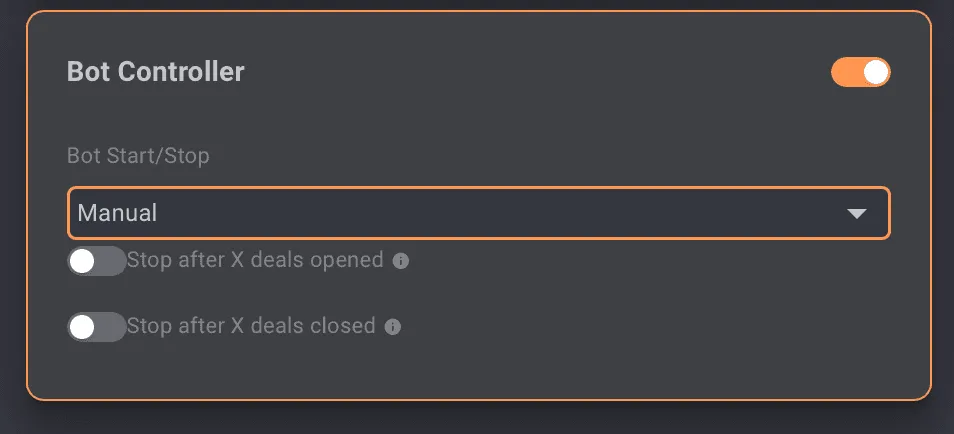
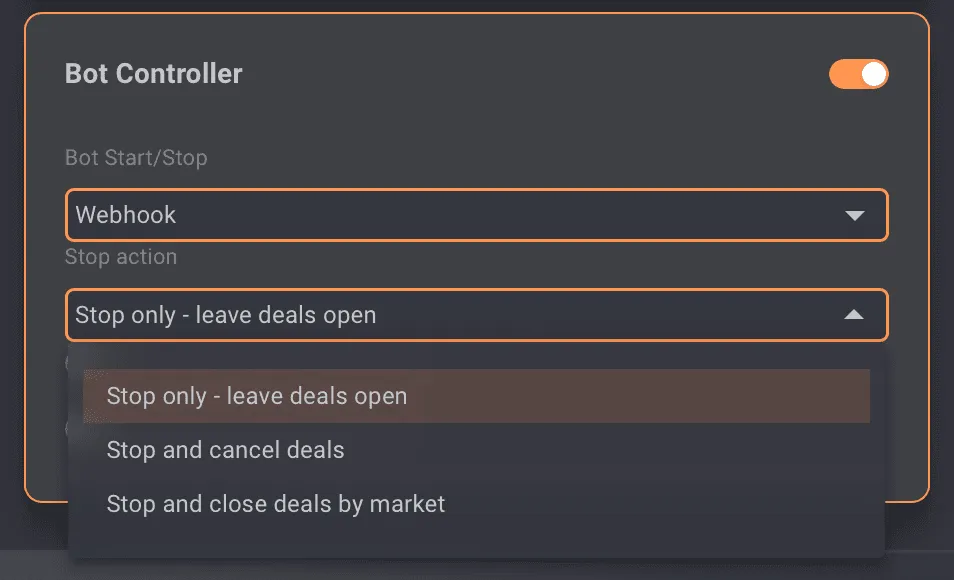
BOT CONTROLLER#
At the end of the bot setup, the Bot Controller (Picture 13) allows you to have even more control of your bot. This is an advanced way to filter out deals by opening or closing a bot using an external indicator (webhook).
 Picture 14
In the bot controller (picture 14), you can decide to do the following:
- Stop Only: will stop the bot so the current deals will stay open, it will keep the open unfilled orders, but the bot won’t open any new deals, -Stop and cancel deals: so the bot will delete all the unfilled orders in the exchange and won’t open any new deals. Note that this means you will keep all the coins the bot has purchased so far. In our BTC/USDT bot, it means that if the bot purchased some Bitcoin, the Bot controller would cancel the unfilled orders, but it won't sell the BTC that managed to buy so far.
- Stop the bot and close deals by market. This is an example where there is a use case for Market Orders as you want to close all the deals asap in case of a sudden change in the market trend. All your purchased coins will revert to your quote in the trading pair. In the case of our BTC/USDT, it means that if the bot purchased some BTC, it will cancel all unfilled orders and sell back to USDT the already purchased BTC.
 Picture 15
Now some practical examples of how to use this.
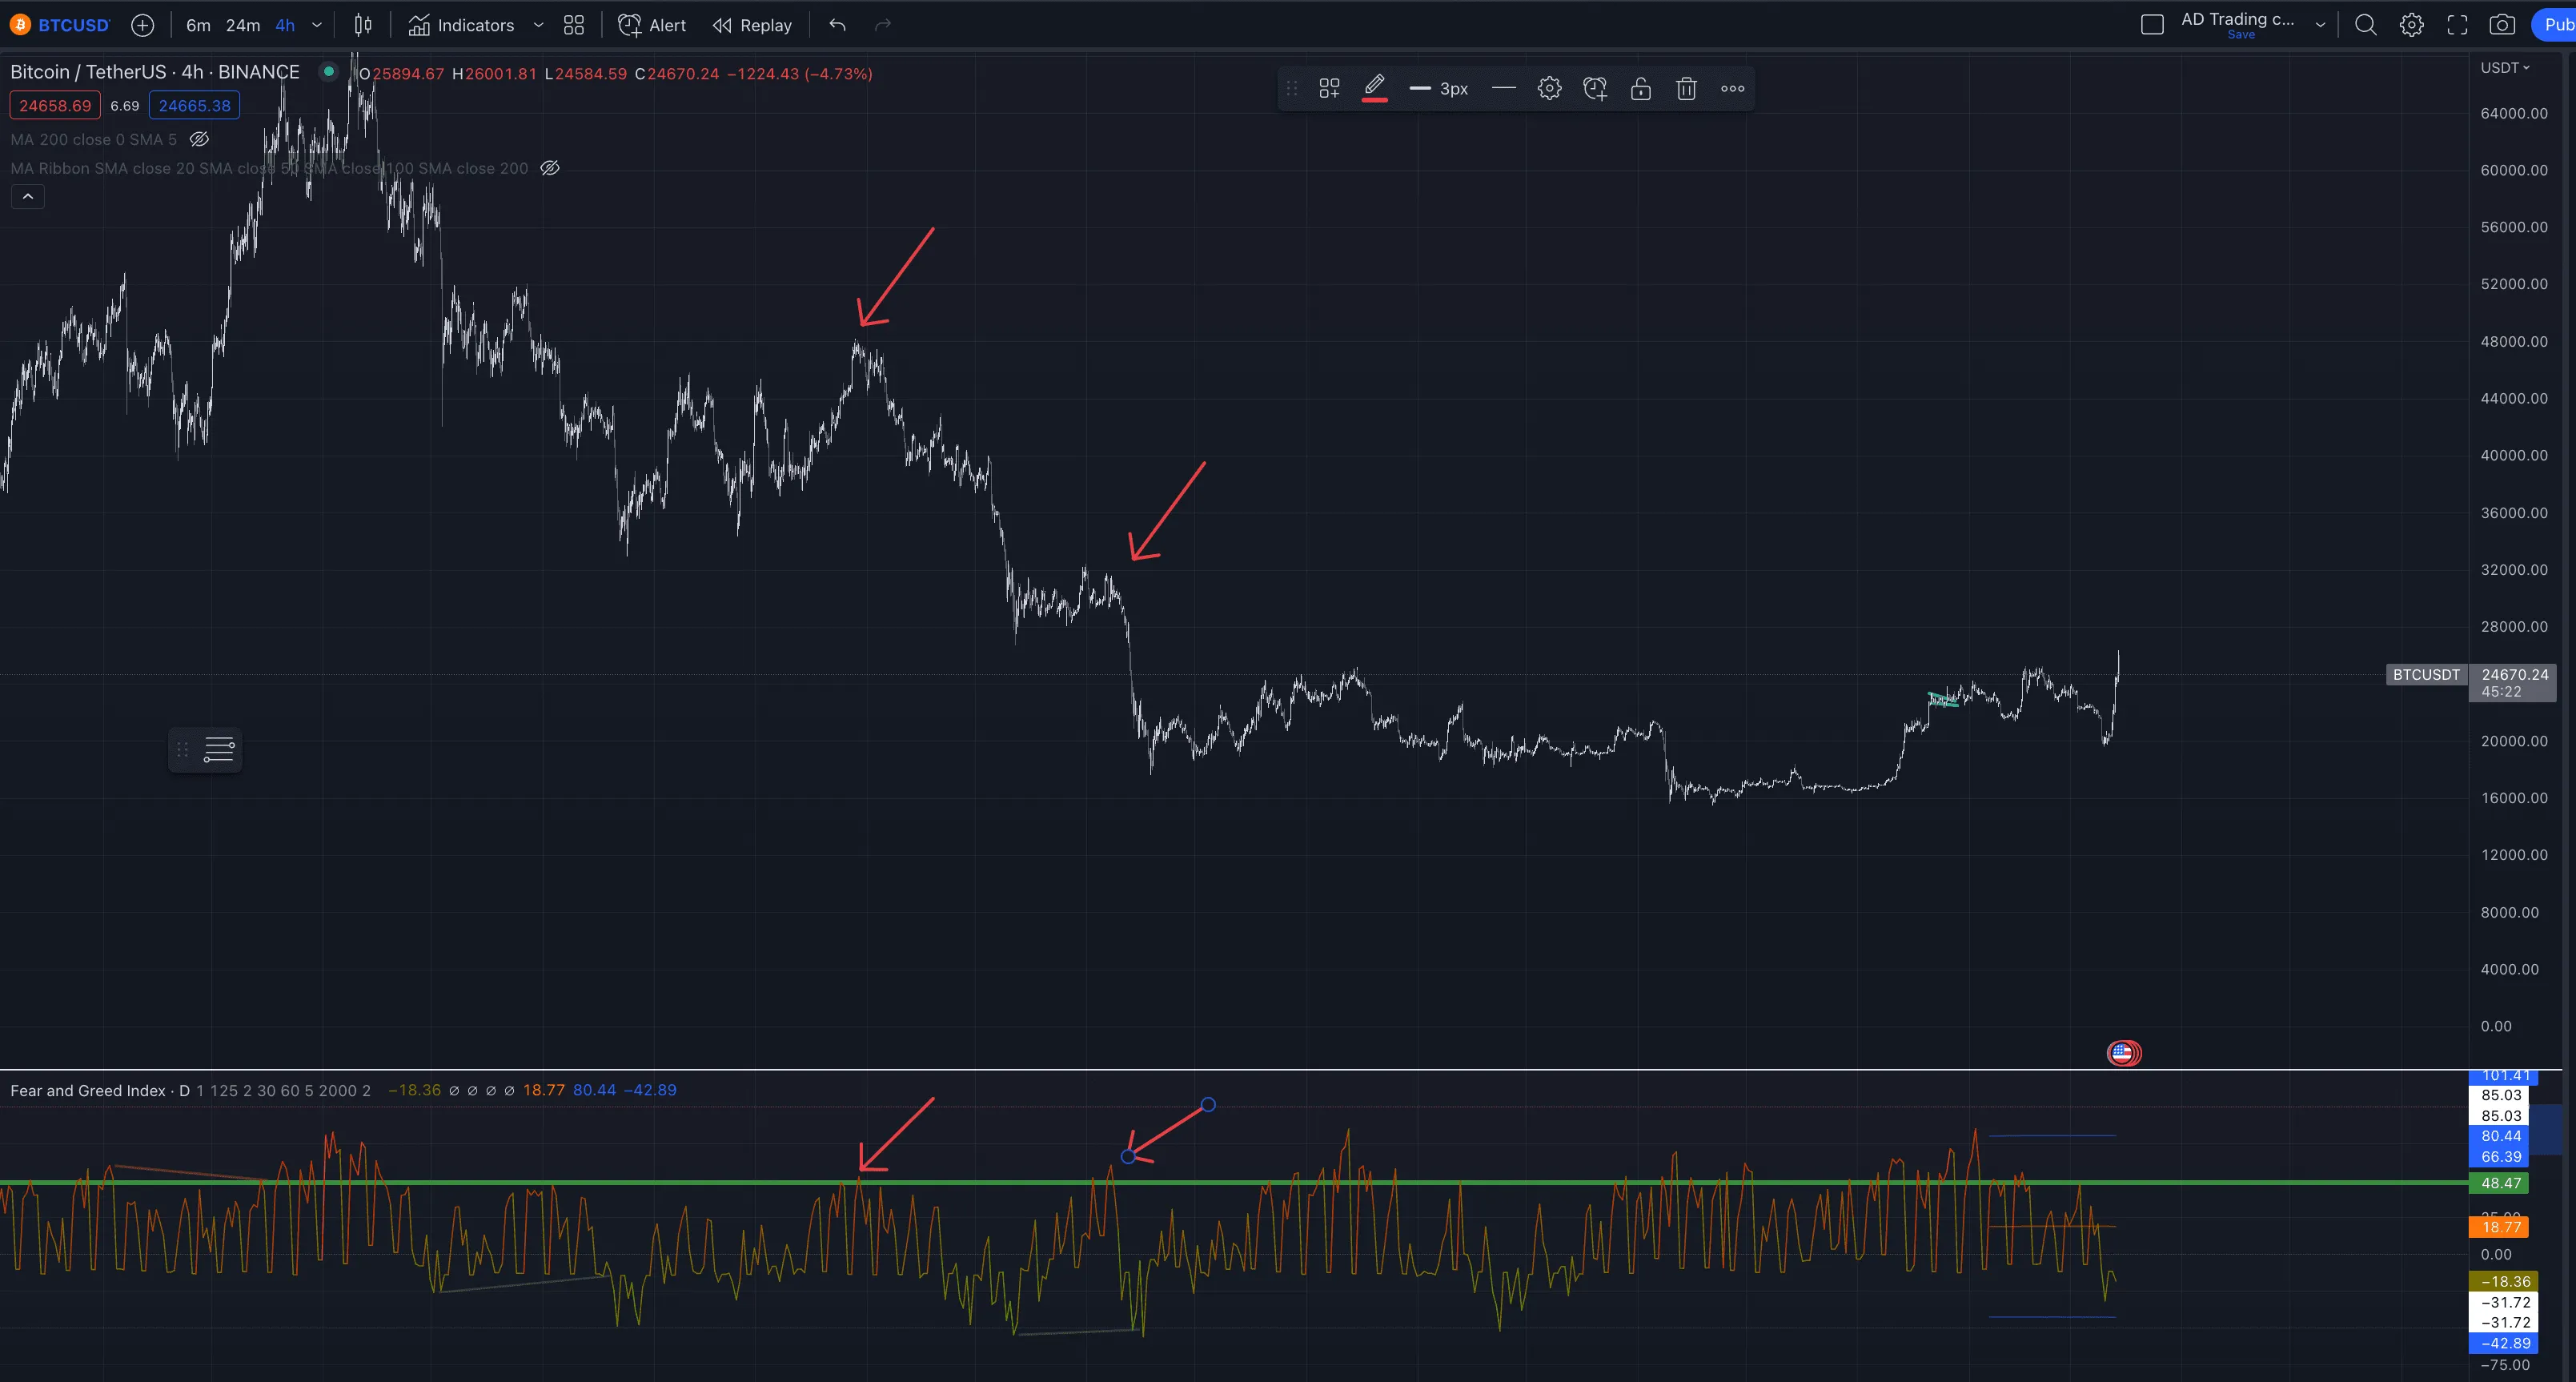
EMA RIBBONS#
The Ema Ribbon indicator is often used to determine the trend of Bitcoin. A Moving Average is an indicator that captures the change in the price of an asset over time. Ema Ribbon is an indicator that consists of 4 Moving Averages: 20, 50, 100, and 200 MA. As you can see from the picture below (Picture 15) when the 20 MA crosses down the 50 MA, the trend changes significantly, and bitcoin is not considered bullish anymore. So you might want to create an alert to stop all or some risky bots during this time, as Altcoins tend to follow the BTC trend. This is true for Alts unless we enter Altcoin season.
 Picture 15
FEAR AND GREED INDEX#
The Fear and Greed index is another popular indicator that can be used to stop your bots. This index gauges when traders are too bullish or too bearish. And in general, when they are too extreme, the price tends to revert the trend.
As you can see from the picture below (Picture 16), when the Greed Index is very high, the price retraces. So you might want to set up an alert to stop the bots when the value is above 50.
 Picture 16
DXY and TOTAL2#
Other popular charts that can be used to orchestrate bots are DXY and TOTAL2.
DXY is the dollar index, and Bitcoin generally trades inversely to the dollar, so you might want to stop some bots when the DXY trend is bullish.
TOTAL2 shows the total market capitalization of the top-125 cryptocurrencies, excluding BTC, so you can use this chart to stop some bots trading lower caps when the chart is running hot, as there is a higher risk of a retrace.
There are limitless numbers of indicators that can be used to control bots, and it depends on the bots you are using and the tokens you are trading.
As a general rule, you want to use them in bots that are riskier because they use leverage or leveraged tokens, cover a tiny deviation with DCA, or use a very small timeframe. You might never need to use them in more conservative bots because they are designed to fill as many DCA orders as possible during a downtrend. In this case, a bot controller would halt the profits. So you might never need to use it on a bot that covers a considerable deviation or use an indicator like QFL, a popular indicator used to buy when a support level is broken and available as a deal start condition in Gainium.